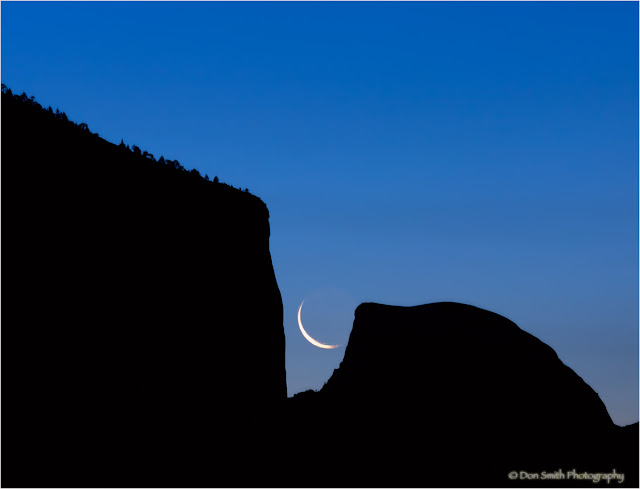
Recently I helped teach a spring Yosemite workshop with my friend and colleague, Gary Hart. I call Gary the moon expert as he usually designs his workshops to take advantage of some phase of a moon rise and/or set. He has an uncanny ability to calculate where and when the moon will appear (no easy feat with the high granite monoliths surrounding Yosemite Valley) and regularly gets his groups into position at the correct time allowing for them to create amazing moon images. I really can't explain Gary's technique for calculating moon positions, but suffice it to say it is a combination of knowledge involving: a compass, azimuth and altitude, checking moonrise and set times, and applying that information to a topo map. On the last morning of the workshop, Gary wanted everyone at the cars at 4:40 am (gulp) to get us in position at a location along Highway 120 looking back towards Yosemite Valley. From that vantage point, there is a narrow gap between El Capitan and Half Dome (two of Yosemite's most iconic monolith formations). Gary had calculated that a 4.8% waning crescent moon would rise between that narrow gap somewhere between 5:15 and 5:20 am! As you can see, almost on-schedule the crescent moon did appear and all that was heard was the clicking of shutters in the morning chill!
 | |||
| A 4.8% waning crescent moon rises between Yosemite's El Capitan and Half Dome. Canon 1DsMKIII, 300 mm at f/11, 4-seconds timed exposure, 400 ISO. |
What resulted from all of Gary's careful calculations was a very cool image that everyone in the workshop nailed (at least I think they did)! I use a different method for calculating a moonrise/moonset using a software called The Photographer's Ephemeris. This software can be downloaded to your home computer and/or laptop for free, and is also available for the iPhone and iPad for a modest cost. I will refer to this software throughout this article by its acronym - TPE. Another friend and colleague of mine, Steve Loos, taught me how to calculate the moon's position relative to one's shooting position using the free version. I now demonstrate this technique at my workshops and will share the information in this article. It is really very simple but effective!
There are two basic pieces of information you must enter into the Photographer's Ephemeris. Part A involves dropping the main (red marker) pin onto the exact location that you are shooting from. As you can see, I marked my spot alongside Highway 120 where Gary had positioned his group. As best I can determine, the name of this location is The Half Dome Viewpoint. Here is TPE's rendering of our position.
Armed with this information, I went back to my RAW files and checked the first frame in my sequence where I did indeed see the moon. Because this moon was waning, just a faint outline of the upper right of the moon appeared at 5:18 am.
Now look at my next frame captured at 5:19 am!
So The Photographer's Ephemeris told me I would see the moon at 5:14 am and I actually first spotted it at 5:18 am (but the tip of the moon - the unlit portion - moved into my frame at 5:17 am). It was three minutes off, but my exact positioning of the secondary pin may have been a bit off also, or I may have missed a peak that was in the moon's path that was just a bit taller. Personally, three minutes in miniscule; the bottom-line is that the moon did appear on-schedule and it resulted in not only an amazing image, but also an incredible experience for the entire group! As Gary told the group, This might just be the most beautiful sight on earth at this moment! I think we all agreed.
One thing that the group experienced was just how fast the moon moved across the gap (actually it was us moving and not the moon, but you know what I mean). The moon moves at a rate of .25 degrees per minute, or 1 degree every four minutes. This information is useful if one knows the angle of view of the lens they are using (relative to the sensor size). It is easy to Google this information. Suffice it to say, if you are shooting telephoto, the moon's motion becomes more of an issue than if you are shooting wide angle. At this time of the morning, I was shooting with an ISO of 400, an aperture of f/11, and needed a shutter speed of 4 seconds. There was a slight blur in the moon if enlarged to 100%. Of course, as the light brightened, my shutter speeds decreased.
I have just installed the iPad version of the TPE app and I also have a version installed on my iPhone. Both of these apps will cost $8.99 each but they are a great tool to help you calculate sun and moon rise and set times from any location on the planet! Here is a link to some tutorial videos that will help you use this software more effectively: The Photographer's Ephemeris Tutorial Videos.
I hope this article has helped you. Would love to hear your feedback!


Great article Don. I had downloaded the desktop version of this program a little while back but have not had opportunity to use it effectively. Your article helps. I just wish there was a Droid version :(
ReplyDeleteGlad it helped Craig - I'm sure a Droid version will be out soon.
ReplyDeleteWith the Blood moon lunar eclipse coming on Monday night (4-14-14) I am going to use this info to plan my vantage point. Thanks. Glenn Tamblingson - www.gktphotos.com
ReplyDelete