Monday, May 9, 2011

Calculating a Moonrise Using The Photographer's Ephemeris

A sure-fire way to add excitement and emotional appeal to your images is to include a moon. There are two phases of the moon that I love to photograph - a full moon and a crescent moon (either waning or waxing). The trick is knowing where and when the moon will rise and set relative to your shooting position. If you are photographing a full moon, generally you would want to keep detail in the moon and match it to some detail in the landscape. You get two chances for this type of image per month - once when the moon is rising and once when it is setting. We will save that topic for another article. What I would like to discuss today is how to calculate any phase of the moon (rise or set) from your vantage point. The beauty of photographing crescent moons is that I don't worry about keeping detail in the moon - to my eyes, there is no detail. Thus, time of day (or night) becomes a moot point.

Recently I helped teach a spring Yosemite workshop with my friend and colleague, Gary Hart. I call Gary the moon expert as he usually designs his workshops to take advantage of some phase of a moon rise and/or set. He has an uncanny ability to calculate where and when the moon will appear (no easy feat with the high granite monoliths surrounding Yosemite Valley) and regularly gets his groups into position at the correct time allowing for them to create amazing moon images. I really can't explain Gary's technique for calculating moon positions, but suffice it to say it is a combination of knowledge involving: a compass, azimuth and altitude, checking moonrise and set times, and applying that information to a topo map. On the last morning of the workshop, Gary wanted everyone at the cars at 4:40 am (gulp) to get us in position at a location along Highway 120 looking back towards Yosemite Valley. From that vantage point, there is a narrow gap between El Capitan and Half Dome (two of Yosemite's most iconic monolith formations). Gary had calculated that a 4.8% waning crescent moon would rise between that narrow gap somewhere between 5:15 and 5:20 am! As you can see, almost on-schedule the crescent moon did appear and all that was heard was the clicking of shutters in the morning chill!
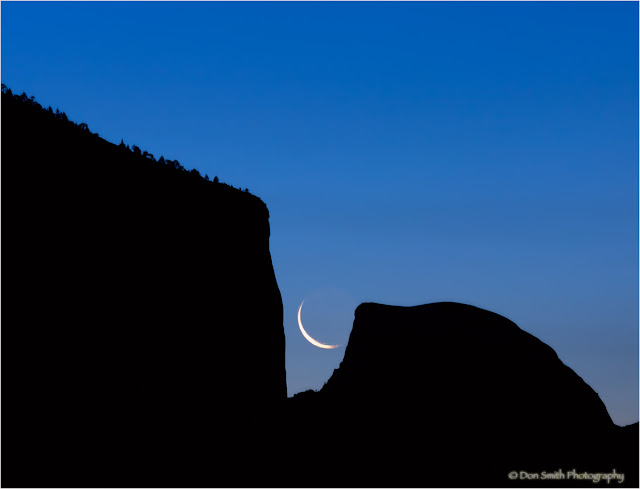
A 4.8% waning crescent moon rises between Yosemite's El Capitan and Half Dome. Canon 1DsMKIII, 300 mm at f/11, 4-seconds timed exposure, 400 ISO.


What resulted from all of Gary's careful calculations was a very cool image that everyone in the workshop nailed (at least I think they did)! I use a different method for calculating a moonrise/moonset using a software called The Photographer's Ephemeris. This software can be downloaded to your home computer and/or laptop for free, and is also available for the iPhone and iPad for a modest cost. I will refer to this software throughout this article by its acronym - TPE. Another friend and colleague of mine, Steve Loos, taught me how to calculate the moon's position relative to one's shooting position using the free version. I now demonstrate this technique at my workshops and will share the information in this article. It is really very simple but effective!

There are two basic pieces of information you must enter into the Photographer's Ephemeris. Part A involves dropping the main (red marker) pin onto the exact location that you are shooting from. As you can see, I marked my spot alongside Highway 120 where Gary had positioned his group. As best I can determine, the name of this location is The Half Dome Viewpoint. Here is TPE's rendering of our position.

The red pin marks the spot alongside Highway 120 in Yosemite and marks the groups shooting position. The light blue line shows the moonrise path relative to the highest peak in its path (see secondary gray marker). I used the Terrain mode so I could see the elevations of the various peaks along the route of the moonrise that would prevent me from seeing the moon. As you can see here, TPE told me that the moon would appear above the highest peak (elevation 11,000 feet) at 5:14 am and still be within the gap between El Capitan and Half Dome relative to the groups shooting position.
So how do I go about finding the highest peak in the moon's path relative to my shooting position? I simply enlarged the viewing screen of TPE and scrolled along the the moonrise line checking elevations of various peaks until I find the highest. Here is an enlarged view showing the tallest peak along the moon's rise path just above Vogelsong Lake in the Yosemite high country.

Once I found the tallest peak along the moonrise path, I simply dropped the grey marker (called the secondary pin) on that point. I then tapped the right arrow key on my keyboard until the moon's altitude turns from grey to black. In this example, I needed an altitude higher than my Apparent Altitude of +3.0 degrees, and as you can see, I got +3.1 degrees at 5:14 am.

Armed with this information, I went back to my RAW files and checked the first frame in my sequence where I did indeed see the moon. Because this moon was waning, just a faint outline of the upper right of the moon appeared at 5:18 am.

Look closely at bottom left of gap and you will see a faint outline of the moon (may be hard to see at this resolution but it is there). Remember this was a waning crescent so only the bottom-left of the moon is lit. I captured this frame at 5:18 am.


Now look at my next frame captured at 5:19 am!

Now the bottom-left lit potion of the moon begins to appear in the frame. The image that leads off this article was captured at 5:21 am. Remember, the moon is rising so it is moving on a track towards upper right from this position.

So The Photographer's Ephemeris told me I would see the moon at 5:14 am and I actually first spotted it at 5:18 am (but the tip of the moon - the unlit portion - moved into my frame at 5:17 am). It was three minutes off, but my exact positioning of the secondary pin may have been a bit off also, or I may have missed a peak that was in the moon's path that was just a bit taller. Personally, three minutes in miniscule; the bottom-line is that the moon did appear on-schedule and it resulted in not only an amazing image, but also an incredible experience for the entire group! As Gary told the group, This might just be the most beautiful sight on earth at this moment! I think we all agreed.

One thing that the group experienced was just how fast the moon moved across the gap (actually it was us moving and not the moon, but you know what I mean). The moon moves at a rate of .25 degrees per minute, or 1 degree every four minutes. This information is useful if one knows the angle of view of the lens they are using (relative to the sensor size). It is easy to Google this information. Suffice it to say, if you are shooting telephoto, the moon's motion becomes more of an issue than if you are shooting wide angle. At this time of the morning, I was shooting with an ISO of 400, an aperture of f/11, and needed a shutter speed of 4 seconds. There was a slight blur in the moon if enlarged to 100%. Of course, as the light brightened, my shutter speeds decreased.

I have just installed the iPad version of the TPE app and I also have a version installed on my iPhone. Both of these apps will cost $8.99 each but they are a great tool to help you calculate sun and moon rise and set times from any location on the planet! Here is a link to some tutorial videos that will help you use this software more effectively: The Photographer's Ephemeris Tutorial Videos.

I hope this article has helped you. Would love to hear your feedback!

Friday, October 15, 2010

Behind the Scenes at NHL and NBA Media Days

Even though I spend a lot of my time photographing beautiful landscape scenery, I still keep up on my sports photography as team photographer for the NHL San Jose Sharks and as a contract photographer for the NBA. Every fall both these leagues get into full-gear starting with the opening day of training camp and the much anticipated Media Day.

I thought it would be fun to give you a behind-the-scenes look at the 2010 camps of both the Sharks and the NBA Sacramento Kings. As team photographer for the Sharks, my duties involved capturing the official mug shots of each player, coach, scout, broadcaster, etc. A 4 am wakeup allowed me to get to our practice facility by 5:30 am. I was assisted by my oldest son Rob and friend/colleague Mike Hall Here is the standard league-required mug shot as we started-off capturing head coach Todd McLellan at 6:30 am. I also included a frame of our awesome radio broadcaster Dan Rusanowsky holding up his name tag. Each person (yes even the superstars) are required to hold a name tag prior to the sequence of images being captured so no mistakes are made by the person editing.


The League pretty much dictates the lighting pattern (two lights at 45 degrees bounced into umbrellas). I used a standard 2:1 lighting ratio and added a kicker light camera left from a 45 degree angle behind the subject fitted with a 10-degree grid. I custom balanced the skin tones with the help of the ExpoDisc.

These images will serve as the player's official mug shot for Media Guides, television broadcasts, and arena big screens. Here is an image of Mike working with star defenseman Dan Boyle.


Once the players finished with this station, it was off to the elaborate Comcast setup where the players and coaches were filmed for the cool openings used at the opening of the Sharks game broadcasts. Each year the directors allow me access behind their cameraman and I simply bump my ISO to 1200 and shoot with my 70-200 mmL at f2.8. The results look increible mixed with their elaborately lit sets. We periodically use these images on our Shark's Game Magazine cover and for some of the openers. Here is an image of Captain Joe Thornton being put through the paces.


After completing this set, the players were ushered to an adjoining set constructed by our in-house crew utilizing a green screen where graphics and a variety of video scenes can be added. Here is our director Steve Maroni going over instructions with defenseman Niclas Wallin prior to filming a promo for the team's opening season trip to Stockholm, Sweden.


Next it was star forward Dany Heatley's turn. I was blown away by how meticulously lit the set was - notice the beautiful rim light along Dany's face and hair. I made sure I thanked the the guys who lit the set as I was really stealing their artwork. They were very nice about it and said most photographers blast away without giving a second-thought to who lit the set - lighting is truly an art and these guys are two of the best (wish I would have gotten their names so I could give them credit).


It is an unwritten protocol around professional sports for the rookies to show up first and allow the veteran's the earned right to arrive later in the morning for their session. While waiting for some of our star players to emerge for their images, I noticed these wide-eyed rookies checking out some of the vets getting in their practice time on the ice.


Start to finish this session lasted 7 1/2 hours. A lot of images were captured and will be used throughout the season in a variety of ways.

With one training camp underway, it was time to turn my attention nine days later to the official opening of NBA training camps - specifically the Sacramento Kings. This was my 12th year photographing an NBA Media Day and this year I was representing both the League and the team itself shooting to a multitude of lists. Once again Mike accompanied me for the 2 1/2 hour drive and the two-hour setup of two sets. We were instructed to setup in the player's lounge at Arco Arena. Here is an image of Mike standing on one of our two sets.


The players started with our sets, which unfortunately caused quite a backup as each was to pose for mug shots and video game shots on the blue backdrop, then be moved to the white coved set for further poses. I also had to photograph five players in various poses against the blue backdrop for a billboard advertisement. Here is guard Francisco Garcia posing for his official mug shot. Unlike the NHL mug, I was restricted to just two strobes bounced into umbrellas for an overall even lighting pattern.


After the players completed their images on the blue backdrop, I simply turned around, changed the channel on my Pocket Wizard transceiver and shot them on this coved seamless. The light had to be very even on this set. I positioned two lights high up bounced into 36-inch white umbrellas at equal power to serve as the front light, then did a high/low X-pattern (basically criss-crossing the light) to allow the background to match. I taped some Black-Wrap to each of the background lights to prevent spill. I was pleased that the entire set was lit evenly allowing for white uniforms to show against white seamless with many dark-skinned athletes - kind of tricky but I think we nailed it after much tweaking of the lights.

Here are a few frames of Samuel Dalembert (dribbling) and Tyreke Evans (sitting).


Even some of the King's employees got into the act.


The League also requested that we do some close-ups of the player's tattoos, fortunately the guys were up for it.


My 2 1/2 hour 1200-plus frame session ended with some player group shots (left to right - DeMarcus Cousins, Hassan Whiteside and Eugene Jeter). 


It took Mike and I another hour to breakdown and pack, then the 2 1/2 hour trip back home (Mike had another hour drive after that).  Bottom line, Media Days are a lot of hard work with some stress thrown in (even after all these years).


Thursday, October 14, 2010

Combining Beauty with Beauty - Photographing an Athlete in Big Sur With the Help of Smart Flashes and Pocket Wizard Flex TT5 Remotes

For the past three years I have been toying with the idea of adding the human form to some of my favorite iconic landscape locations. The main reason stopping me was the thought of lugging heavy mono-head strobes and battery packs (along with a bevy of light modifiers) onto location. Now thanks to the Pocket Wizard Flex TT5 Remote Transceivers and my Canon Speedlite Flashes, wireless off-camera light is available while retaining full TTL. In short, I can shoot from distances never before imaged (in excess of 400 feet) from my subject and retain full communication between the camera and flash - how cool is that!

Once my friend and professional fitness trainer Mary Margaret Lanning agreed to act as my model, it was off to the beautiful shores of Garrapata State Park along the northern end of the Big Sur coast on a late lazy-fall afternoon. Also helping with this session was friend and fellow photographer Mike Hall who added valuable input and handled the bulk of the lighting setups for the 2 1/2 hour shoot.

We started the session having Mary Margaret jogging along a trail that afforded a view northward towards the rocky Garrapata shoreline. I had discussed wardrobe selections with her prior to the shoot and she brought along various tops, sweatshirts and stretch pants to add a nice mix to the session. I decided to have her start with a bright yellow top that I felt would grab the viewer's attention against the beautiful blue sky. Mike and I placed two Canon 550EX Speedlites on extended light stands and powered each one with a Quantum Turbo Battery. Each flash was attached to a Pocket Wizard Flex TT5 and another TT5 was on my Canon 1D MKIV. Using one light would have worked but I was able to cut the recycle times in half by having a pair placed on either side of the trail pointed back towards the sun. We're talking about throwing a lot of light back at our subject - 8 stops worth as Mary Margaret had the sun directly to her back. The flashes are just out of view to camera right and aimed at her face. I shot a sequence (at 10 frames per second) and we got flash on 5 of the frames - not too shabby!


Next we took Mary Margaret to one of my favorite coves/beaches below Sobranes Point. What I love about this location are the two sea stacks and the plethora of rocks for foreground subjects. Game for trying anything I asked and without hesitation, she climbed up on a boulder that placed her perfectly between the sea stacks.

I asked her to try some stretches that mimicked the vertical lines of the stacks and I simply responded to her actions.

I had Mike boom a light stand with a Canon 550EX flash pointed directly back towards the sun and instructed him to aim it at Mary Margaret's face and the combination of her nimble stretch against the deep blue sky produced this awesome image.

As you can see, by having her climb on the rock, it allowed me to take a low perspective and isolate her perfectly against the sky with each sea stack acting as a placeholder. I also loved how her vibrant tank top complimented the blue sky.

I felt it was important to retain the shadow on the right side of Mary Margaret's face that allowed for depth and modeling. Had we shot with an on-camera flash, or had Mike place the light over my head, the direction of the light would have eliminated all the shadows and in-turn, eliminated the feeling of depth.

Think about where your shadows will fall when placing your lights. You need to ask yourself if you wish to retain the shadow, how opaque do you want it to be, or do you wish to eliminate it altogether? You are the artist so it is your call.

Getting on and off this beach is no easy feat. It requires climbing up/down a rather steep incline (could there be other images to be made here)?

As you can see the answer was  - YES! Again, without hesitation the agile Mary Margaret took to climbing up the cliff as if she was a professional rock climber. I remember repeatedly asking her to be careful as I had horrible memories of seeing someone take a nasty fall at this location (how would I explain this one to her husband - "well see, I thought it would be fun to have her become a rock climber...").

I started with some detailed images of her hands and lower legs trying to show the strain of climbing these rocks, then had her pass by me from a low angle as I shot from the side and below.

We then went ahead of where she was climbing and I positioned Mike precariously with a light just to my right as the sun was coming from camera left and behind. As you can see, the strobe filled the otherwise harsh shadow on the left side of her face yet retained the candid look without its presence being felt (important when lighting outdoors).

Back on top of the headlands and keeping a close eye on the time, we headed northward to the Sobranes Arch. This is one of my favorite views and one I routinely take workshop participants to. After putting Mary Margaret through numerous stretches with the arch serving as a recognizable background element, I hit on the idea to have her power run up the steep hillside.

I positioned Mike to camera right as the sun was getting very low in the sky (about 45 degrees to camera left). Again the goal was not to completely eliminate the shadow; rather, I wanted to "open-up" the shadow but retain the natural feeling of the light. After a few test frames Mike suggested adding another light just to camera left to help speed the recycle times and it worked like a gem allowing me to shoot a burst of 6 frames as Mary Margaret powered up the hill with each frame lit perfectly!

If you follow my blog and writings, you have undoubtedly read how the sensor can only capture a limited range of light (no more than 6 stops - 64:1 contrast range) while our eyes can see an incredible 11 stops (2000:1 contrast range). I wanted the image to reproduce the scene the way my eyes saw it, not with the camera's limited dynamic range.

The only instructions I gave Mary Margaret was to really pump the arms and legs - difficult to do starting from a 30-degree incline, 150 feet over a crashing sea, with non-native ice plant waiting to trip her up. But once again she did exactly as I asked and this was the result!

Our last location was to move to the north side of the arch, a trek that takes us past a hillside of poison oak! After carefully maneuvering up and down some bluffs (and even pausing to shoot some frames of Mary Margaret hiking up a trail bathed in sweet light) we reached our sunset spot. Mike had hustled back to the car to retrieve a Lastolite 2' x 2' Ezybox Softbox as I wanted to soften the flash's output to match the soft light of sunset.

I again put Mary Margaret through a series of stretches with the main idea of having the stretch mimic the formation of the Sobranes Arch and the Whales Hump in the distance. As you can see, she once again gave me the look I wanted while retaining a very natural appearance as if she was working out with no one around.


Mike had boomed the Lastolite Ezybox with a Canon 550EX Speedlite over my head and aimed back at our model and again the goal was to add soft light to the shadow. The warm tone on Mary Margaret's face was courtesy of the low setting sun. I shot this frame about a minute before the sun disappeared.

After the sun set, we placed a full cut CTO warming gel over the flash head and continued shooting for another 15 minutes. The warming gel replicated the warmth of the setting sun even though it had exited camera right (behind a small wall of fog). In this final frame, I wanted Mary Margaret to look as if she was finished with her workout and was just enjoying the beautiful scenery (not hard to do in this location). Again Mike had boomed the soft box well to camera right aimed directly back at her and the contented look on her face made the image and session complete!

Tuesday, August 17, 2010

Three Ideas for Improving Your Compositions - July/August 2010


Recently I posted a blog photo of Kauai's Wailua Falls. Included in the narrative was a discussion on how I approach an iconic scene (one that has been photographed by nearly everyone with a camera) and apply my own personal vision to the scene. I wrote about a mental checklist I run through my mind and how I applied this checklist to this image. Here is the image along with the checklist:

The falls were obvious, but what about the mist? What about the lush foliage? What about the interesting mountain behind this scene (not included in this frame)? What about the interesting cloud floating over the top of the mountain? (also not included in this frame)? Where is the light coming from? (backlit). Do I need a GND filter to control contrast (in this frame I did not). What mood will the light evoke? Are there any potential problems that could work against us in creating this image? (flare, wind, mist blowing on our lenses, hot spots that will draw the eye out of the scene)? How can I best control those problems? What lens will work best for the scene? (I used a 24-70 mm). Should I use a polarizer, and if I do, have I remembered to turn it? Are my filters clean? Does this scene work better as a horizontal or vertical (I challenge you to shoot both), how should I frame this scene? What do I want the viewers to see? What aperture is required to produce my desired depth-of-field? Will my shutter speed be an issue? Do I include a foreground? Can I photograph this scene from a different vantage point (unfortunately we could not though there is a steep trail to the bottom of the falls - not one I would use in a workshop).


This particular post drew many responses, which lead me to believe that the thought process of a professional and the thought process of an amateur could well be on divergent tracks. It may also mean that 30-plus years of training and practice have made much of what I do second-nature. Regardless, it proved to me that not only do photographers need guidance with the technical (craft) side of photography, but also the creative side (vision). Add to the mix that we now process our own images and I can begin to see how our brains feel like they are overloaded!

So let's turn-off our left brains, tune in to our right (creative) brains and see if you can absorb and then apply the following three ideas that will hopefully improve your landscape photography vision skills.

Idea Number 1: Learn the Limitations of your Camera


I find in teaching workshops that many photographers fail not because their personal creative vision is bad; rather, because they don't understand the differences between how their camera sees the world versus how they see the world. Why do I discuss this under a heading of COMPOSITION? My answer is simple; no composition will survive, regardless of how strong it is, if the image is not correctly exposed.  The primary limitation I would caution you to pay attention to is in the limited dynamic range of your camera's sensor. In technical terms we can measure this limitation in stops of light. Our incredible visionary systems can see in a contrast range of 2000:1 or 11 stops of light. The best 35mm camera sensors on the market today can only see a range of 64:1 or 6 stops of light. Some top-of-the-line medium format cameras allow for a bit more dynamic range due to the larger pixel heads, but I think most of us shoot with 35 mm, so I will limit my talk to this medium.

Let's take a look at a sequence of images of another iconic waterfall located on the Garden Isle of Kauai - Opaeka'a Falls.


As you can see, not one exposure captured the entire range of light due to the limited dynamic range of the camera. The image (far left) was the correct exposure for the sky but the falls and foliage were too dark. The middle image was a bit better for the foliage but the sky and mountain began to wash out. The final exposure (right) worked well for the shadows but the waterfall and sky lost all detail. To my eyes, this scene looked great but to the camera's limited eyes, this scene looked terrible! Thankfully there are workarounds to this problem.

On the capture end, I could have used a graduated neutral density filter. My filters of choice are Singh-Ray Filters. But alas, my filters were safely inside my hotel room! On to plan B, bracket exposures via my shutter by one-stop to cover the range of light from shadows to highlights. Once back at my computer, I can use a HDR specific program (I like using Photomatix Pro) to blend the various exposures into one image. You can read more on this amazing software by clicking here: High Dynamic Range Images With Photomatix Pro. Here is the my finished image after blending the above frames:


Idea Number Two - Learn to Crop in the Camera


If you are one of those photographers who work on the premise of, I'll fix it in Photoshop, let's get rid of that idea starting now! I'd rather hear a photographer say, I'll get it as perfect as I can in the field! This not only applies to exposure, but also to cropping. Too many times we are reluctant for whatever reason to crop precisely in-camera. If you want to take your photography to the next level, it is imperative that you rid yourself of that notion right now. Not only should you be cropping while looking through your viewfinder, but you should also be trying both horizontal and vertical framing.

In the image below, I was so fixated on capturing this incredible dusk sky that I neglected to turn my camera to the vertical format. As you can see by viewing the vertical crop, an entirely different image emerged once I began to play with the crop tool. I did not see the receding three hills in my original frame because my eye was too focused on the sky. I also did not see the prominence of the oak tree in relation to these hills until I slowed myself down and allowed my eye to view the possibilities within my frame.

My advice to you is to take time with every scene you photograph and see if there is a picture within your original frame that you did not immediately spot. It is a great learning exercise to go back to 3-5 of your images you were a bit disappointed with and see if you can find the image you really intended to capture by simply playing with the crop tool!


Idea Number 3: Pay Attention to Spacing of Elements


My final tip for this article is one that must really be pre-programmed into your thought process for every image you capture and that is paying attention to the spacing of elements within your frame. An element can be any physical item in your frame. If we look at the above vertical image of the oak tree under the dusk sky, you will see that fortunately I did not allow the canopy of the tree to merge into the line of the foreground hill. I did unfortunately allow the tree trunk to merge with the middle hill. In a perfect world, if I would have cropped this frame in my camera (and not during post), I would have spotted this and would have moved to my left, which in turn would have shifted the position of the tree to the right where I would have centered it within the two smaller hills resulting in a cleaner and more depth-revealing frame.

Remember that we work in a 2-dimensional medium, so paying careful attention to overlapping lines and shapes is critical in creating the illusion of depth. If you take a look at this image of Pedestal Rocks found  at Stud Horse Point outside of Page, Arizona, you will see that I was careful with where I chose my point of view.


A low angle of view allowed me to make sure all the caps of the rocks sat above the horizon line (especially with the far right cap). I also made sure that none of the lines of the caps overlapped. In reality, I could see the spatial relationship between these three hoodoos, but in a 2-dimensional print (or on the web) the spatial relationship would have been lost if I would have allowed the lines/shapes to merge.

Learning to see with a camera is no different than learning any other aspect of photography. Our digital cameras can bring us hours of fun visually interpreting the world around us, but they can also demand a lot of our time if we are serious about making images to the next level. It's important to learn your craft well, but it is even more important to learn to see images!